
Alchemy Help:
Image Map Editor
[Contents]
[Index]
[Map files]
[Drawing tools]
[Clickable areas]
[Menu items]

The Alchemy Image Map Editor
The Image Map Editor is used to create clickable image map files.
It allows you to load a GIF- or JPEG-format graphic file, draw clickable areas on the
image, and save the areas as an image map file. The editor supports NCSA- and
CERN-style server-side image maps, as well as client-size image maps which use the
HTML MAP tag.
The process for determining image map file names varies somewhat depending on the type of
image map with which you are working. If you are working with a server-side map, the editor
expects the map file to have a .map extension, and the graphic file will have the
same base name as the map file with either a .gif or .jpg extension.
For example, if your map file is named "my_image.map", Alchemy will try to locate and
load a matching graphic file named either "my_image.gif" or "my_image.jpg". For client-side
maps, the map file will have a .htm extension and will contain a named image map,
and the name of the map will be the same as the base name of the graphic file. For example,
you may have an HTML document named "homepage.htm" which contains (along with other source
code) an image map named "my_image" (as in MAP NAME="my_image"). Alchemy will try to locate
and load a matching graphic file named either "my_image.gif" or "my_image.jpg".
When you create a new image map, Alchemy displays the New image map
dialog box.
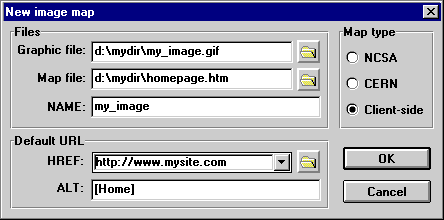
Alchemy determines the default Map type setting by checking the
Image maps setting in your project file. The contents of
the dialog will vary depending on the type of image map you select. For example, CERN-style
maps do not allow comments so the default URL's Description field
is not displayed if you are working with a CERN-style map.
There are three drawing tools available for defining clickable areas;
they are contained in a tool palette at the left side of the editor window.
- Rectangle - Draws a rectangle.
- Circle - Draws a circle.
- Polygon - Allows you to trace the outlines of an image.
You select a drawing tool by clicking on it with the mouse. Once you select a tool, it remains
active until you select a different one.
To create a clickable area, select the drawing tool you want to use
by clicking on it with the mouse, then click mouse on the image and drag. For rectangles
and circles, the URL dialog will be displayed when you release the mouse button, allowing you to
associate a URL with the area you have just defined. For polygons, the dialog will be
displayed when you close the area by clicking the mouse on or near the point at which you
started drawing the polygon.
To modify an existing area, click on the area with the mouse to select it. You can change
the URL information by selecting the Edit/Modify URL... menu
item, or by double-clicking on the area. You can adjust the position of the area by pressing
the cursor keys on the keyboard.
To delete an area, click on the area with the mouse to select it and select the
Edit/Delete URL menu item.
To modify the graphic file that is displayed beneath the image map, select the
Edit/Edit image... menu item.
Here's a walkthrough of the Image Map Editor menus.
- File
New...
Displays the New image map dialog box and allows you to create a
new map file and to select the graphic file which will be used as the clickable image.
Open...
Displays the Open file dialog box and allows you to select an image
map file to load. This will be a file with a .map extension for server-side maps,
or a .htm extension for client-side maps. If you select a client-side file which
contains more than one image map, a list box containing all of the maps in the file will
be displayed; select the map which you want to edit.
Save
Saves the image map file
Exit Alchemy
Terminates the Alchemy application.
- Edit
Properties...
Displays the Image map properties dialog box and allows you
to specify the default URL which is referenced when the user clicks on an area of the image
for which no URL is defined.
Modify URL...
Displays a dialog which allows you to modify the URL of the currently selected area.
Delete URL
Deletes the currently selected area.
Edit image...
Sends the graphics file to an editor application. Alchemy will select the appropriate
editor application based on the file type.
- Helpers
Allows you to go to a helper application window such as an image editor. You set these
items up in the Helper applications section of the
Alchemy preferences dialog.
- Window
Allows you to selectively display, go to or hide any of the Alchemy windows. You set
these items up in the Windows section of the
Alchemy preferences dialog.
- Help
Contents
Displays this file.
About...
Displays Alchemy product, contact and version information
 A Next Wave communication. © Copyright 1996
Next Wave Software.
All rights reserved. Feedback to
feedback@stormsurge.com.
A Next Wave communication. © Copyright 1996
Next Wave Software.
All rights reserved. Feedback to
feedback@stormsurge.com.